

How to Build a Drone | A DIY Guide
I know what you’re thinking. That’s a whole lot of words and I’m not even sure this page is what I’m looking for. Let me summarize:
If you want to learn how to build your own drone, you are in the right place. There are many types of people that may be interested in this new drone world. However, this guide is dedicated for the nerds (and I mean that as a compliment).
If you are one of these hobbyists (euphemism for nerd), allow me to be your guide in your journey of building a diy drone. Think of me like a Gandalf, and yourself as a Frodo. This is all too apt an analogy, as your new drone hobby might turn into an addiction much like a ring that you never want to take off. So be warned. I digress.
This guide is based off my course on how to make your own drone. If you’re interested in learning more about this subject, the course features 6 hours of video lectures in a structured curriculum.
It is the perfect course of college students and drone entrepreneurs, or anyone with a DIY attitude who is interested in flying robot things. Students have used this course as a launch pad to create their own drone applications, so I highly recommend checking it out if you are trying to develop a new drone innovation.
But I digress 🙂
After finishing this step-by-step guide, you will have learned:
- All of the parts required to fly a drone
- How to find your own parts to make your own drone. So no pre-assembled drone kit required
- How to assemble the parts that you have chosen
As number 2 shows, this guide will arm you with the knowledge to find your own parts instead of just soldering together electronics from a pre-assembled list of parts that comes in a drone kit. As the saying goes “Give a woman a fish, she will eat for a day. But teach a woman to fish, and she will eat for a lifetime”, or something like that.
You may already have a particular type of drone you would like to build in mind, like a small FPV quad or a larger octocopter to lift a payload. The beautiful thing about the drone hobby is that the anatomy of a drone is just about the same for any type of drone you would like to build.
With this in mind, this guide is intentionally generically written, so it can be used as a reference for any type of drone.
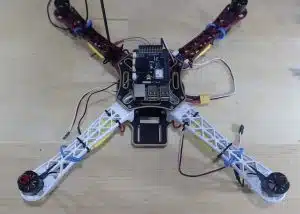
If you’d like to build the drone featured in this guide, checkout this raspberry pi drone parts list.
Now let’s get into some diy drone engineering!
Want to stay up to date on any future DIY drone projects? Sign up below and never miss out.
Basic Tools Needed to Build a Drone
- Soldering Iron and solder (Required): You will need a soldering iron for assembling some of your drone parts.
- Helping Hands (Optional): Helping hands keep you sane while trying to solder. They basically hold the part wanting to be soldered in place.
- Multi-meter (Optional): A multimeter is just generally a good tool to have in your toolbox, and could greatly help in diagnosing any electrical problems you may encounter with your drone
- Double sided sticky tape (Required): This is almost the most important part for any drone build, and I’m only sort of kidding. You will be fixing many parts to your frame simply with double sided sticky tape.
- Velcro (Required): A strip of Velcro is very helpful for fixing your lipo battery to your frame
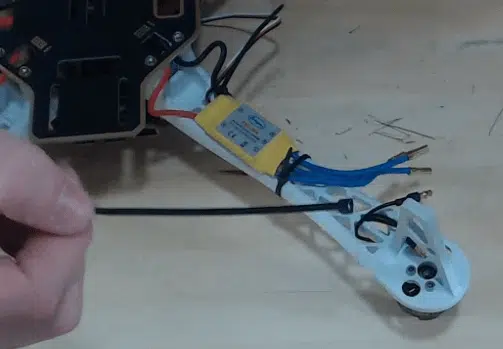
- Zip Ties (Required): Some drone hardware is easier to fix to the frame with simple zip ties, like ESCs (See below).
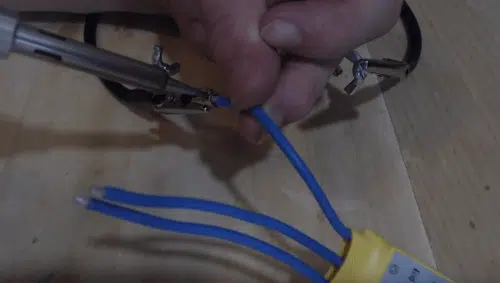
- Heat shrink or electrical tape (Required): Your motors and ESCs will probably be connected with bullet connectors (More foreshadowing, see below). If these metal bullet connectors touch while you’re flying, the circuit will short out and your drone will probably crash down to earth. Avoid this terror by placing an insulator around your metal bullet connectors.

Basic Drone Parts for a DIY Drone
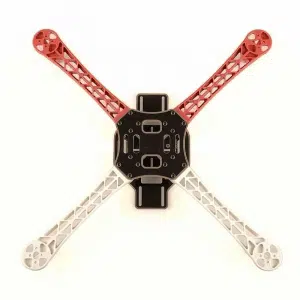
Frame
There are two main things to note about the frame of your drone. The first being how many arms there are. Each arm will normally have one motor, which will have one propeller. For this reason, drones with multiple motors are simply referred to as ‘multirotors’.
Tricopter: A drone with three motors.
Quadcopter: A drone with four motors.
Hexacopter: A drone with six motors.
Octocopter: A drone with eight motors.
Quadcopters are by far the most popular, so we will be focusing on how to make a quadcopter in this guide.
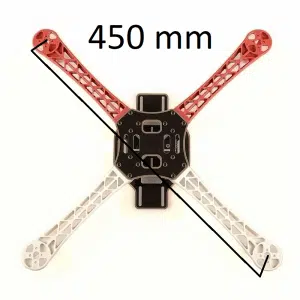
The second thing to know about frames is the size. Frame sizes list the farthest distance that two motors are from each other. For quadcopters, this normally means measuring the distance between two diagonal motors in millimeters (sorry Americans).
Nano Drone: 80-100 mm
Micro Drone: 100-150 mm
Small Drone: 150-250 mm
Medium Drone: 250-400 mm
Large Drone: 400+ mm
If you want to make a drone from scratch, selecting the frame size is going to be your first step.
Motors
There are two main types of motors: brushed and brushless. Your cheaper ready to fly drones will be using brushed motors, and that’s because they are using the cheaper motor. While cheap, they wear down and break much faster than brushless motors. Brushless motors last much longer and are the preferred motor of choice for diy drone builds.
There are innumerable amounts of brushless motors out there. To help you determine what motor will go best with your build, most manufacturers give you some information about the product. The two most common specs are the size and KV rating.
Let’s look at a particular example.
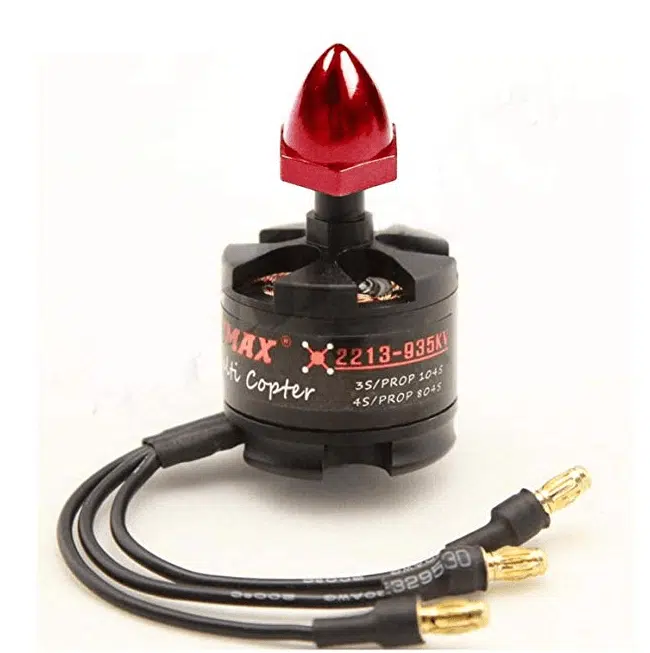
Here the motor size is 2213. That is really representing two numbers and should be shown like this: 22-13.
The 22 is the width of the stator in mm, and the 13 is the height of rotor in mm. Typically, the wider the width, the more torque the motor have.
Another spec that comes with brushless motors is the KV-rating. On our example motors, it is 935KV. Don’t confuse KV with kilo-volts. Here KV rating means RPMs per one volt of input.
So if we supplied 1 volt to a 935 KV motor, it would spin at 935 RPMs. Two volts input would cause 1870 RPMs etc.
Lower KV motors produce much more torque, so can spin larger props at slower speeds to get lift. Larger KV motors produce much lower torque, but spin smaller props much faster to get lift.
Typically larger drones use low KV motors, and smaller drones use high KV motors.
The last thing I’ll say here is most manufacturers will show you the specs of parts that should be used with the motor, which can prove helpful in selecting parts once you’ve chosen your motors.
Our example motor comes with the following helpful information.
Propellers (Props)
The next part in this make a drone guide is the props. Propellers will always come with a four-digit number like 8045, or 1045 or 6030.
The first two digits communicates the diameter of the prop in inches (Yay Americans!). So an 8045 prop will be 8 inches in diameter.
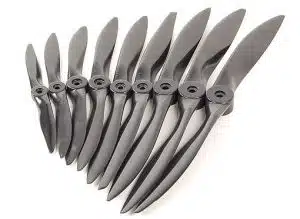
The last two digits represent the pitch, in inches. The 8045 example has a 4.5-inch pitch, and the 6030 prop has a 3 inch pitch.
Pitch is a little less intuitive to understand than diameter. Qualitatively, the higher the pitch the more air will be pushed down. A prop with a pitch of 0 inches would be like spinning a butter knife.
To understand what the pitch actually means let’s use an analogy. Screws have pitch as well. If you turn a screw one rotation into a piece of wood, it will dig itself into the wood at some constant depth.
Let’s now imagine that we placed the pitch of our 8045 prop onto a screw, so the screw now has 4.5 in pitch. One rotation of the screw would cause it to dig into wood by 4.5 inches. We can now see that the higher the pitch of a prop, the more substance (air) it will move.
Higher pitch props are normally used with low KV motors since they provide more torque. They can spin slower since high pitch props are pushing a lot of air per unit of rotation. Lower pitch props are used with high KV motors since they spin much faster. Accordingly, they have to spin faster since they are pushing less air per rotation.
Electronic Speed Controllers (ESC)
If you are using a brushless motor, you will need an electronic speed controller. Brushed motors do not require an ESC because they only need a simple DC voltage input.
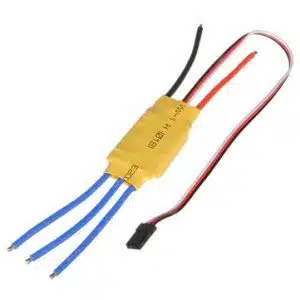
Brushless motors on the other hand require an input of three out of phase voltages. Don’t worry, this sounds scarier than it is. All you have to do is supply the ESC with a DC input voltage, and it will automatically generate three out of phase voltages that connect to the motor, causing it to spin.
Your manufacturer will tell you the range of input voltages your ESC can handle, so keep an eye on that.
Typically your ESC will come with three outputs, and you will solder some male bullet connectors to the ends that will attach to the female bullet connectors of the motors.
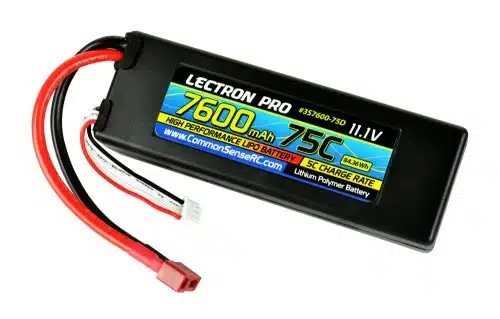
Lithium Polymer Battery (Lipo battery)
Your battery powers everything on your drone. Choosing the right battery is crucial to making a drone.
Almost always the battery of choice for drones is the Lipo battery. This is for its attributes of high capacity and high output current.
A typical Lipo battery will come with specs like this: 3000 mAh 4S 50C
Lipo Cell Count
Let’s start with the 4S part. A battery pack is a bundle of individual little batteries, called cells. A lipo cell always has a voltage of 4.2V when fully charged, and 3.7V when depleted. So the 4S means that four of these Lipo cells were placed in series. Since batteries connected in series add voltages, we know the fully charged voltage of the total battery pack is:
(Cell count)(Fully charged Voltage)=(4 cells)(4.2V)=16.8 Volts
Capacity
Moving onto the mAh spec. This is a measure of capacity, and capacity is normally measured in Coulombs of charge. Think of capacity like the volume of a liquid container; it simply represents how much charge is in the battery.
SUPER NERD STUFF ALERT. SKIP TO C-RATING IF YOU DON’T CARE ABOUT UNITS!
But wait! mAh has no units of Coulombs in it! It actually does, but it’s just hidden. Let me explain.
1 Amp = 1 Coulomb/second = 1 C/s
1 h = 1 hour = 3600 seconds
m = milli = 1/1000
So subbing in our variables into mAh:
3000 mAh = 3000(1/1000)(1 C/S)(3600 s) = 10800 Coulombs
So 3000 mAh is the same thing as saying 10800 Coulombs.
The next part is the C-rating
C-Rating
The higher the C rating, the higher the output of current can be for that battery.
To find out the maximum current output your battery can handle, take the C rating and multiply it by the capacity of your battery in units of Ah.
The C rating has units of inverse hours (1/hour)
3 Ah*50(1/h) = 150 A
So this hypothetical 50C battery could output 150A of current!
Now there is some confusion on what the C rating actually means. Some manufacturers’ C rating simply means the maximum burst current you could output for 30 seconds, and others use the C rating to indicate the maximum continuous current output. Check with your specific battery manufacturer to determine which C rating they are using!
Power Distribution Board (PDB)
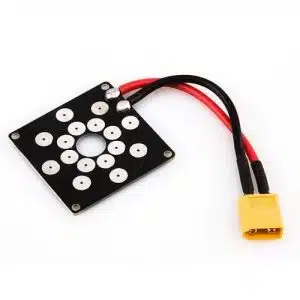
The power distribution board is where your main electrical components will connect. The main things you will solder to your PDB are your ESCs and battery connector.
When you plug in your battery to the PDB, it provides power to everything attached, so this is where your ESCs will be drawing their current from.
Flight Controller
A flight controller is basically the brains of the drone. It is essentially a hardware hub that all your drone parts will attach to. Things like the ESCs, GPS, Telemetry, RC Input and many other components.
All flight controllers should come equipped with a gyroscope and accelerometer (IMU), which together help to automatically balance your drone without any manual input.
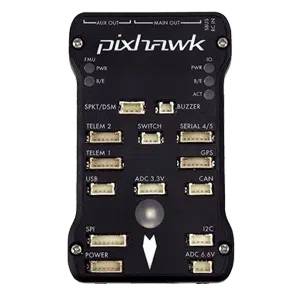
All flight controllers are controlled by the firmware. Depending on the flight controller, you may have access to flash new firmware to the board. Firmware can either be closed source (property of a company that the public cannot see), or open source (the public can see the code and make modifications).
If you’d like to make a drone with open source firmware like ArduPilot or PX4, be sure that the board you are buying is supported.
GPS
GPS modules can be bought for pretty cheap. Typically they use the UART or I2C protocol, and most of GPS modules intended for drone use come equipped with a magnetometer as well.
You should have your GPS/magnetometer module lifted up in the air to get away from the magnetic fields being produced by your drone’s electronics.
If your GPS is too close to the electronics, it could be causing incorrect readings producing some funny flight.
You want to build a drone with a good GPS module. Look for one that has the M8N u-blox chip. These are much better than some of the other GPS modules available on Amazon, and cost around the same.
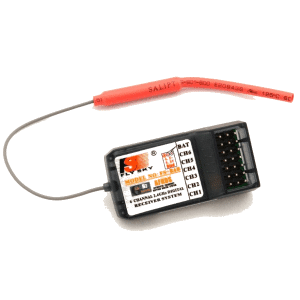
RC Controller
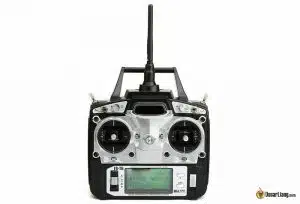
An RC controller will consist of a transmitter (the thing being held by the pilot) and a receiver (to receive the commands from the pilot).
The receiver will plug into your Flight Controller.
You have some options with the RC controller. Cheaper RC controllers have a lower number of channels. However, the minimum number of channels you should use is probably five or six for a drone.
Every drone will take up four channels automatically with the Roll, Pitch, Yaw and Throttle control.
Your excess channels can be used for more unique control, like changing the flight mode of your multirotor.
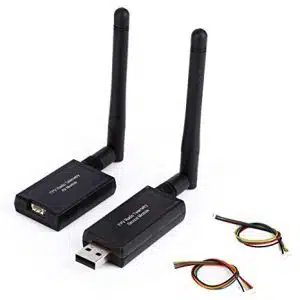
Telemetry
Telemetry is also used to wirelessly communicate with the drone. You definitely want to build a drone with telemetry.
There will be one module attached to the drone, and another to a computer (sometimes referred to as a ground control station GCS). This is typically plug and play.
The GCS can then communicate with the drone remotely. It can both send and receive information.
For example, the GCS could track the drone’s position on a map, determine how fast the drone is moving, see battery voltage levels and many other things.
It can also be used to command the drone, meaning you wouldn’t actually need an RC controller to fly it.
While this is something that is possible and something that is actually done, telemetry is mostly used for receiving data back from the drone.
How to Choose the Right Parts?
Before you start to actually put the parts together and build a drone, we need to know how to find the right parts. The process of choosing the right drone parts is a mixture of both art and science.
The primary metric we will be looking at is the Thrust to Weight ratio, from hereon referred to as the TW ratio.
TW Ratios
We all know how to think of weight. It is the force that we are being pulled to the ground with.
Drones also have weight, and can only fly if they can produce an upward thrust that is greater than their weight.
So a TW ratio of 2 means that the drone can produce twice as much upward force than its weight.
You should aim for different TW ratios depending on the application of your drone. For this reason, having a target TW ratio is the first step in the process of designing your own drone, as you will select parts to achieve that target.
If you are wanting to fly an aggressive FPV drone, TW ratios of 4 and above are typically used, but I’ve seen as high as 11.
For drones designed to carry a payload, TW ratios around 2 are normal, but you could fly with as low as a TW ratio of 1.5.
If your drone has a TW ratio of 1, well, you won’t get very far.
Estimating Thrust to Weight Ratio
To estimate TW ratio, you need to start by estimating the weight of your drone.
This means going through the part list above and adding up the weights of the various components (like motors, ESCs, flight controller etc). You should start with the frame you’d like to build and select parts from there.
Let’s say your estimate of weight for a drone you wanted to build was 1,000 grams. If you had a target TW of 2, this means you would need thrust of 2,000 grams. For a quadcopter, this would mean thrust of 500 grams on each motor.

Estimating thrust of a motor is a function of battery voltage, prop size and motor choice. Change one of these variables and you change how much thrust you will generate.
I like to choose motors from manufacturers that provide thrust tables. Thrust tables have empirical data that show you how many grams of thrust you would have for different variables.
An example of a thrust table can be seen below for the eMax 2213kV motors.
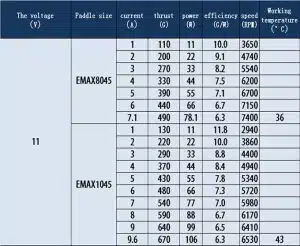
For simplicity, let’s say the maximum thrust of this motor was actually the highest thrust amount shown on this table. We’d have a maximum of 670 grams of thrust if using a 1045 prop/11V battery, or 490 grams if using 8045 prop/11V battery.
So if we used 8045 props, we could produce 1960 grams of thrust (490g * 4 motors) at 11V. If using 1045 props, we could produce 2680 grams of thrust (670g * 4 motors) at 11V.
With a TW of 2, having 1960 grams of thrust with 1000 grams of weight would put us pretty close to our goal.
If you’d like to see a more in depth look at how to select parts for a drone build, my course on how to build drones covers this in detail!
Build a Drone With Your Chosen Parts
- Solder bullet connectors to your motors and ESCs

- Solder the ESCs and battery connector to PDB

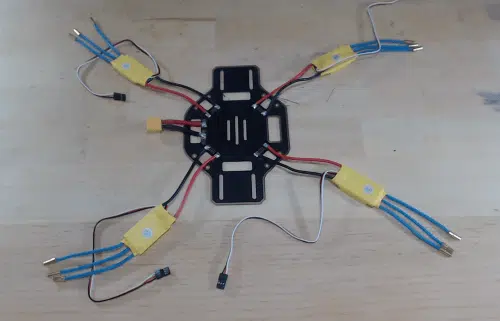
- Fix your PDB somewhere in the middle of the drone. This is typically in the middle or bottom of the frame. Securing the PDB can be done with zip ties
- Fix your ESCs to your drone’s arms: one on every arm. The ESCs can be either on the top or bottom of the arm.

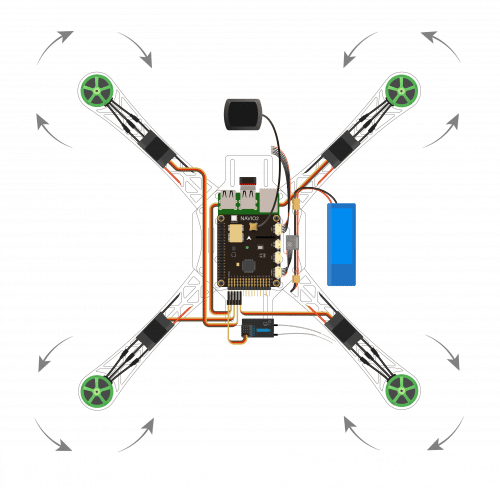
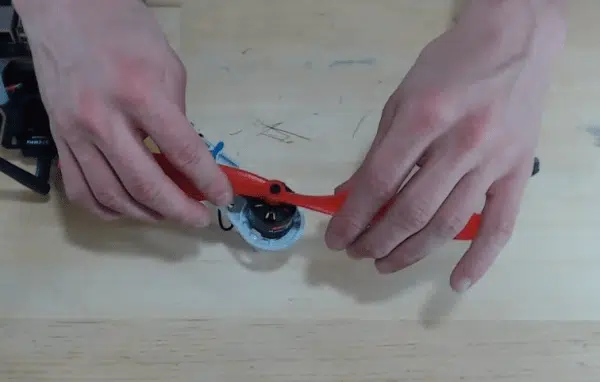
- Screw the motors to the end of each arm. The motors should come with mounting screws. Be sure not to over-tighten. You will have two CW and two CCW motors, make sure they are placed on the correct arms according to this diagram.
- Give it a test fly!
Complete Course on how to make a DIY drone
This guide should have given you some confidence to go out and try and make your own drone. If you are still feeling a little wary of starting your own drone building journey, definitely give my diy drone building course a look.
It covers all of the content outlined in this page, but in much more detail. It also guides you along the drone building process with a list of pre-selected parts if you are wanting to build from a parts list.
As an added bonus the drone built in this course uses a raspberry pi, and who wouldn’t love that?
Let me know if you have any questions or comments below.
Happy flying!